
Routing Policies
Rules that control where your endpoints' traffic goes, and how it is secured.
What is a Routing Policy?
A Routing Policy is a set of ordered rules that control how traffic from endpoints in an Endpoint Group is handled. Each rule matches traffic based on criteria you define (destination IP, protocol, port) and specifies what to do with matching traffic: forward it to a Routing Target, drop it, or reflect it to another endpoint.
A Routing Policy does three things:
- Routes traffic, rules direct packets to the appropriate Routing Target
- Secures traffic, rules act as a stateful firewall; traffic that matches no rule is dropped by default
- Enables edge services, the Edge Services tab controls Remote Access and Embedded Terminal capabilities for endpoints using this policy
Routing Policies belong to a VSlice. All Routing Targets referenced in a policy must be in the same VSlice.
How Rules Work
Rules are evaluated top to bottom. The first rule that matches the traffic applies. If no rule matches, the traffic is dropped.
This means:
- Put more specific rules above more general ones
- A "forward all traffic to internet" catch-all rule should be last, not first
- If you want to block specific destinations, put a Drop rule above the catch-all
Rule Fields
Each rule has the following fields. Fields under Show advanced settings are revealed by checking that checkbox in the Match or Action section.
| Field | Section | Description |
|---|---|---|
| Description | Top | Optional label for this rule. |
| Enabled | Top | Toggle to enable or disable the rule without deleting it. |
| Direction | Match | Uplink: traffic from the endpoint going outbound. Downlink: traffic arriving at the endpoint from a routing target. |
| Apply reflexively | Match | When enabled, return traffic for matched flows is automatically allowed without needing a separate downlink rule. The portal describes this as "Also apply to traffic in the returning direction." Leave enabled in almost all cases. |
| Protocol | Match | Any / TCP / UDP / SCTP / ICMP. Source Ports and Dest Ports fields appear when a specific protocol is selected. |
| Source Ports | Match | Comma-separated port numbers to match on the source side (e.g. 80,443). Leave blank for any port. Appears when Protocol is TCP, UDP, or SCTP. |
| Dest Ports | Match | Comma-separated port numbers to match on the destination side (e.g. 80,443). Leave blank for any port. Appears when Protocol is TCP, UDP, or SCTP. |
| Apply when endpoint is connected to | Match (advanced) | Restricts the rule to apply only when the endpoint is connected via a specific regional gateway. Defaults to Any regional gateway. |
| Action | Action | Forward: forwards matching traffic to a specified Routing Target. Drop: discards matching traffic. Reflect: routes matching traffic back to another endpoint in the current VSlice, subject to the policy applied to that endpoint. |
| Routing Target | Action | Required when Action is Forward. Select from your configured Routing Targets. |
| DNAT Divert IPv4 Address | Action (advanced) | Optionally redirect matching traffic to a specific IPv4 address instead of the Routing Target. |
| DNAT Divert Port | Action (advanced) | Optionally redirect matching traffic to a specific port. Used with DNAT Divert IPv4 Address. |
IP Pattern Examples
| Pattern | Matches |
|---|---|
| (empty) | All traffic |
0.0.0.0/0 | All traffic (explicit) |
10.50.0.0/16 | Any IP in the 10.50.0.0/16 subnet |
10.50.1.1/32 | A single specific IP |
Port Examples
Ports are entered as comma-separated numerical values. Both Source Ports and Dest Ports accept the same format.
| Pattern | Matches |
|---|---|
| (empty) | Any port |
443 | Port 443 only |
80,443 | Ports 80 and 443 |
8080,8443 | Ports 8080 and 8443 |
Example Rule Sets
Basic internet access (all traffic to internet)
| # | Direction | Destination IP | Protocol | Action | Target |
|---|---|---|---|---|---|
| 1 | Uplink | (empty) | Any | Forward | internet |
All outbound traffic goes to internet. Simple and permissive, suitable for development or testing.
Private VPN with internet fallback
| # | Direction | Destination IP | Protocol | Action | Target |
|---|---|---|---|---|---|
| 1 | Uplink | 10.50.0.0/16 | Any | Forward | dc-vpn |
| 2 | Uplink | (empty) | Any | Forward | internet |
Traffic destined for the private data centre subnet goes over VPN. Everything else breaks out to internet.
Private VPN only, no internet access
| # | Direction | Destination IP | Protocol | Action | Target |
|---|---|---|---|---|---|
| 1 | Uplink | 10.50.0.0/16 | Any | Forward | dc-vpn |
| 2 | Uplink | (empty) | Any | Drop |
Traffic to the data centre is forwarded. All other traffic is dropped. Endpoints cannot reach the internet at all.
Vantiq Motors Example
Vantiq Fleet uses two Routing Policies invantiq-fleet:
fleet-road-policy, for HGVs on active routes:
- Rule 1: Uplink to
10.50.0.0/16→fleet-dc-uk-vpn(telematics to data centre)- Rule 2: Uplink to
10.60.0.0/16→fleet-dc-eu-vpn(EU data centre for European routes)- Rule 3: Uplink all →
fleet-internet-eu(firmware updates, driver app)
fleet-depot-policy, for HGVs in depot for maintenance:
- Rule 1: Uplink all →
fleet-dc-uk-vpn(all traffic over VPN, no internet)- Edge Services: Remote Access Proxy enabled (technician can open vehicle diagnostic UI in browser)
Edge Services Tab
The Edge Services tab within a Routing Policy enables advanced access capabilities for endpoints using this policy.
Embedded Terminal
Enables a browser-based SSH terminal to the endpoint device. When enabled, a Connect button appears on the endpoint's Remote Access tab, opening a terminal session in the browser without requiring a VPN client or static IP.
Remote Access Proxy
Proxies HTTP/HTTPS traffic to a web interface running on the endpoint device, making it accessible via a unique URL. No public IP or VPN client needed on the connecting device.
Important prerequisite: You must create at least one Edge Service under Configuration → Edge Services before you can enable Remote Access Proxy here. Without one configured, you will see the error: "You must have at least one remote access proxy configured."
The steps are:
- Create the Edge Service first (specify the protocol and port the device's web UI uses)
- Return to this Routing Policy → Edge Services tab
- Enable Remote Access Proxy and select the Edge Service from the list
- Save
The proxy URL then appears on each endpoint's Remote Access tab.
Configuration Order
When building your configuration from scratch:
- Create a VSlice with a subnet
- Create a Routing Target, start with Internet, no configuration needed
- Create a Routing Policy, add rules referencing the Routing Target
- Create an Endpoint Group referencing the Routing Policy
- Assign endpoints to the group
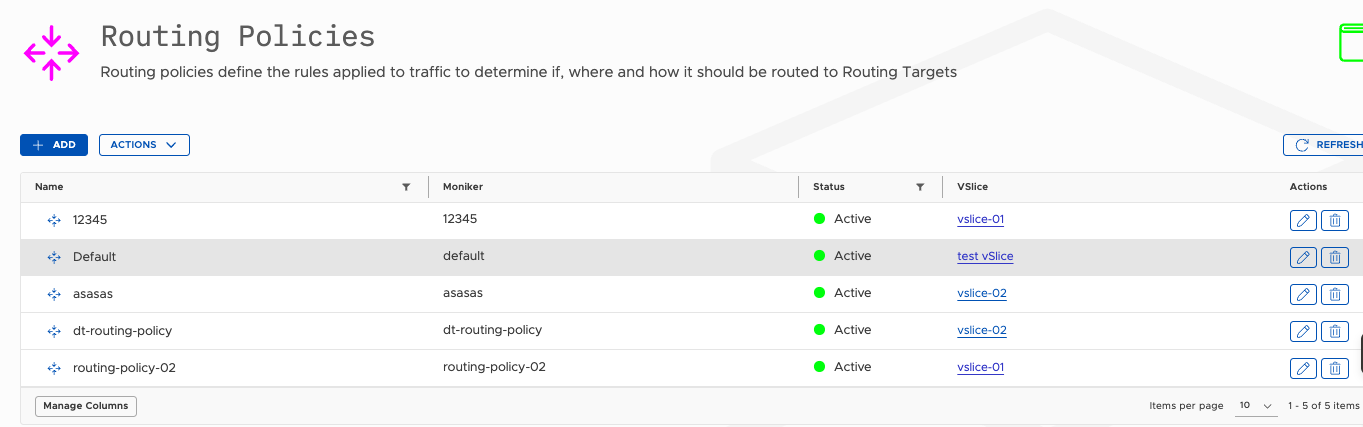
Where to Find Routing Policies
Navigate to Configuration → Routing Policies.
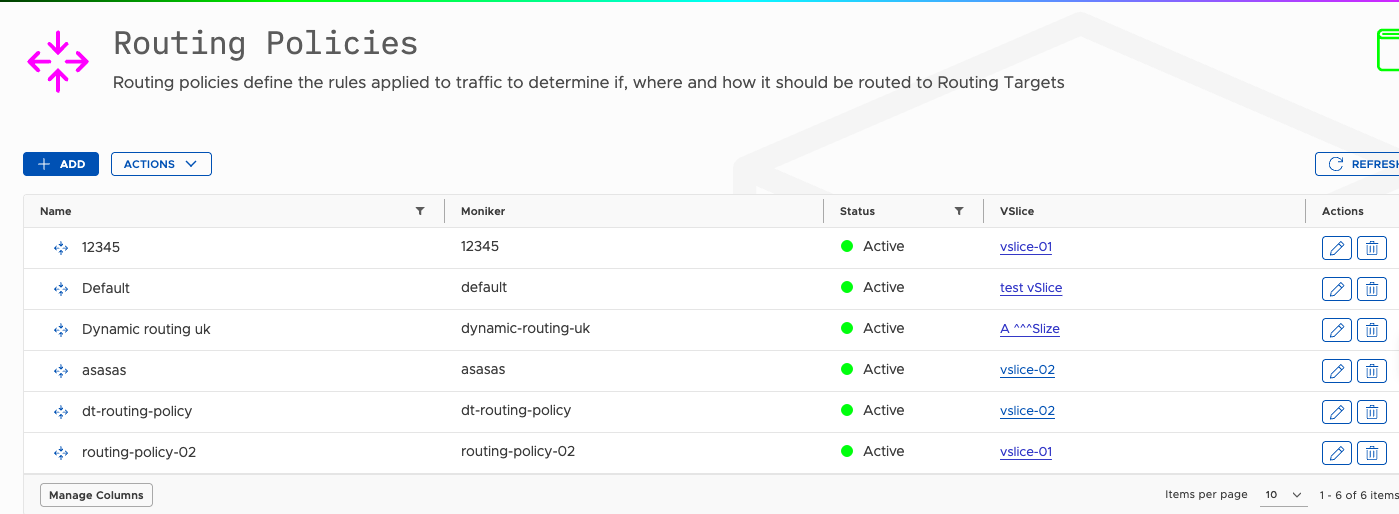
From this screen you can:
- Create Routing Policies
- Edit existing ones, including adding rules and configuring Edge Services
- Delete those no longer needed
Create a Routing Policy
Prerequisites
You need at least one Routing Target in the same VSlice before you can write useful rules. Create an Internet Routing Target first if you have none, it requires no configuration.
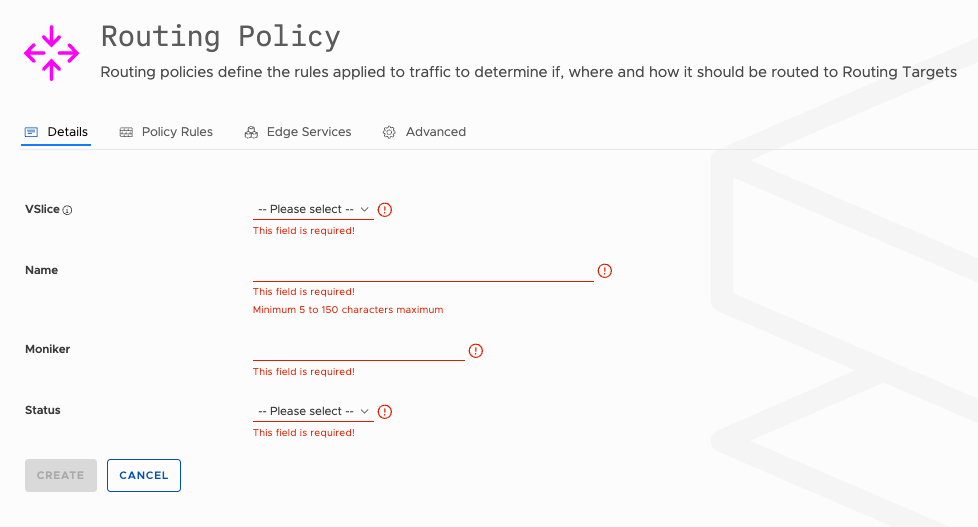
Steps
- Go to Configuration → Routing Policies.
- Click the Add button.
- Fill in the fields below.
- Click the Create button to save.
- After creation, edit the policy to add rules and configure Edge Services.
Fields
| Field | Required | Changeable? | Notes |
|---|---|---|---|
| VSlice | Yes | No | All Routing Targets referenced by this policy must be in the same VSlice. |
| Name | Yes | Yes | 5–150 characters. |
| Moniker | Yes | Yes | Used in the API. Before changing, consider the impact on systems that use the API. |
| Status | Yes | Yes | Active or Suspended. A suspended policy applies no rules. All traffic from endpoints using it is dropped. |
Next Step: Add Rules
Once you have your Routing policy created, you can add Policy rules to it.

Edit a Routing Policy
Add, reorder, and update rules and edge services.
Steps
- Go to Configuration → Routing Policies.
- Click the edit icon next to the policy.
The edit screen has four tabs: Details, Policy Rules, Edge Services, and Advanced.

Details Tab
| Field | Notes |
|---|---|
| Name | Can be changed. |
| Moniker | Can be changed. Before changing, consider the impact on systems that use the API. |
| Status | Active or Suspended. |
VSlice cannot be changed after creation.
Policy Rules Tab
Add, edit, reorder, and delete traffic routing rules.
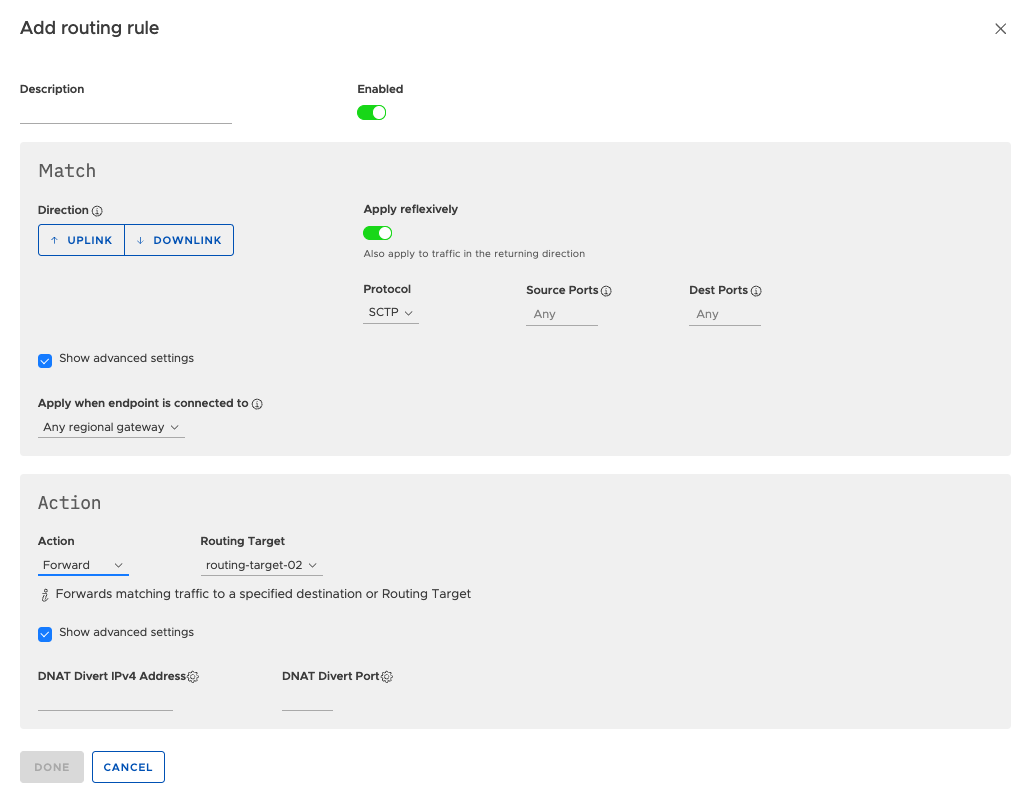
Adding a rule:
- Click Add Rule. A modal dialog opens.
- Optionally enter a Description for the rule.
- The Enabled toggle is on by default. Leave it on unless you want to save the rule in a disabled state.
- In the Match section, select Direction (Uplink or Downlink) and Protocol (Any, TCP, UDP, SCTP, or ICMP).
- Apply reflexively is enabled by default. Leave it on in almost all cases.
- If you selected TCP, UDP, or SCTP, Source Ports and Dest Ports fields appear. Enter comma-separated port numbers (e.g.
80,443) or leave blank for any port. - Check Show advanced settings in the Match section to reveal the Apply when endpoint is connected to field. This defaults to Any regional gateway and can be used to restrict the rule to a specific gateway.
- In the Action section, select Forward, Drop, or Reflect. If Forward, select a Routing Target.
- Check Show advanced settings in the Action section to reveal DNAT Divert IPv4 Address and DNAT Divert Port for traffic redirection.
- Click Done.
Rule ordering: Rules are evaluated top-to-bottom. Drag rules to change their order. More specific rules must appear above more general ones. The last rule is often a catch-all: forward all remaining traffic to an internet target, or drop it.
Editing a rule: Click the edit icon on any existing rule.
Deleting a rule: Click the delete icon. Takes effect immediately.
Changes to rules apply immediately to all endpoints using this policy. If any endpoints have active sessions, those sessions are not terminated. Subsequent packets are routed according to the updated rules.
Edge Services Tab
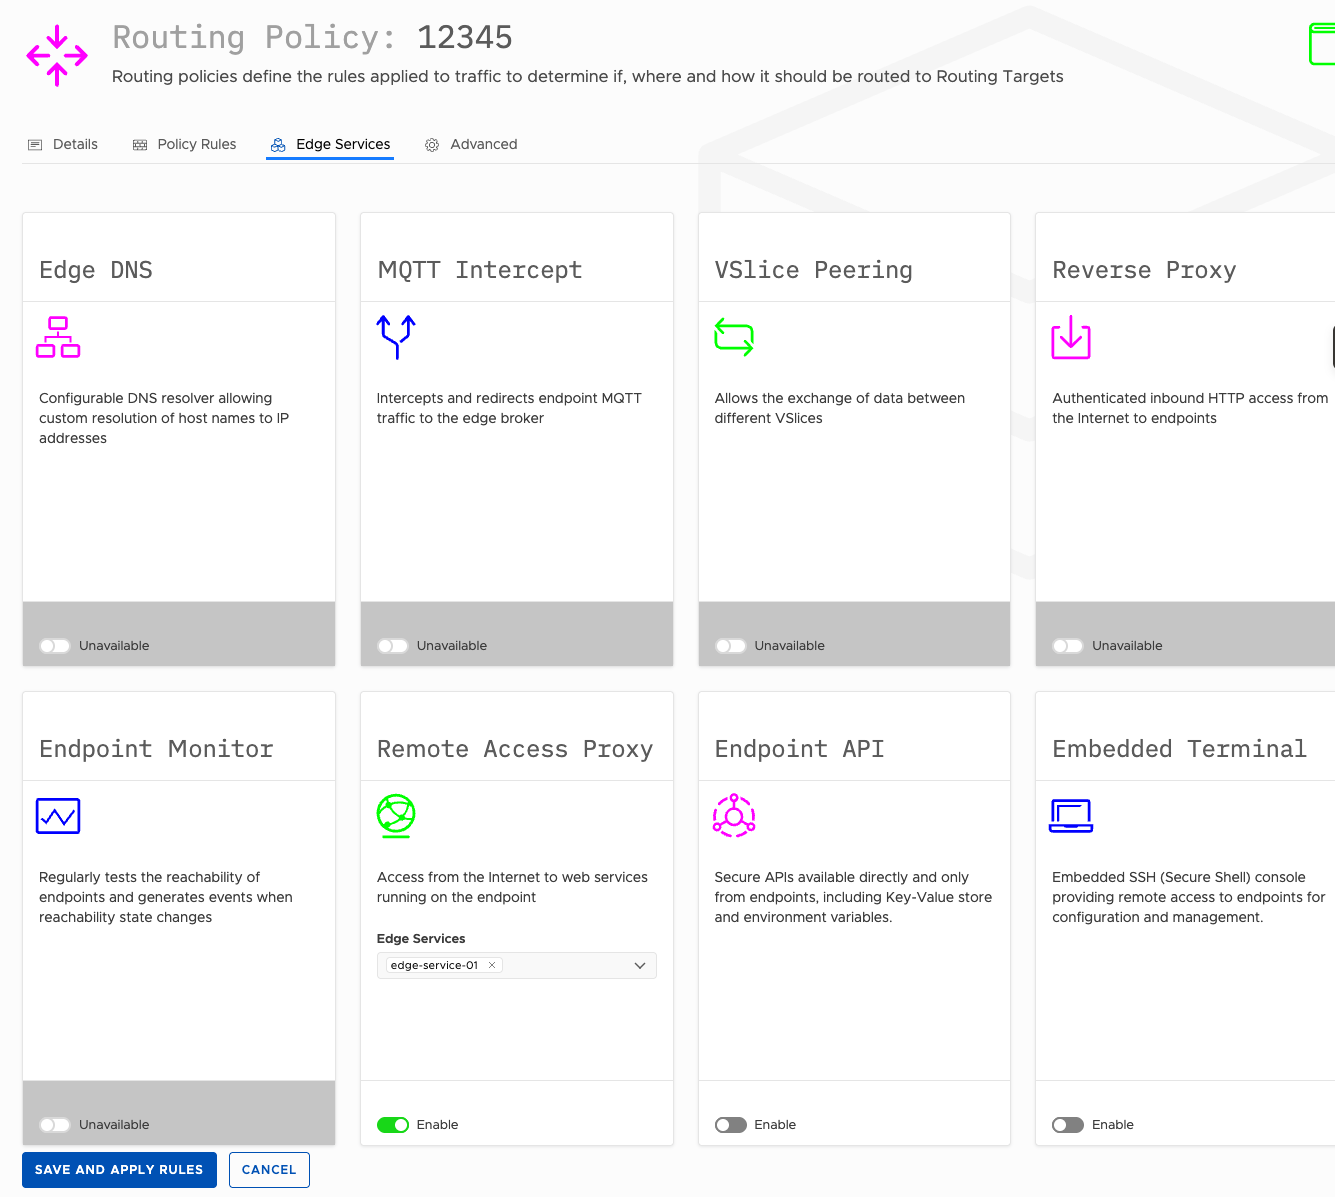
| Service | Description |
|---|---|
| Embedded Terminal | Toggle on to enable browser-based SSH to endpoints using this policy. |
| Remote Access Proxy | Toggle on to enable browser-based access to a web UI on the endpoint device. Requires at least one Edge Service to be configured. |
If Remote Access Proxy is enabled with no Edge Services available, you will see: "You must have at least one remote access proxy configured."
Create an Edge Service under Configuration → Edge Services first, then return here to enable and select it.
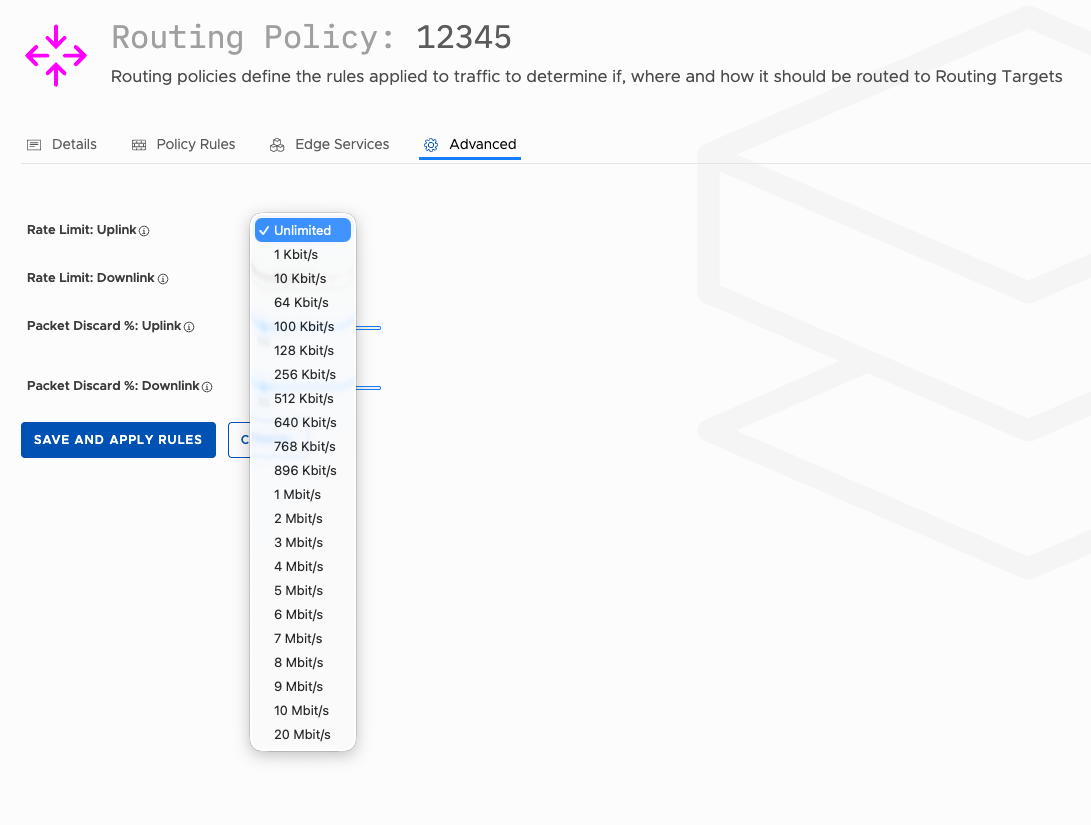
Advanced Tab
The Advanced tab provides traffic shaping controls for all endpoints using this policy.
| Field | Description |
|---|---|
| Rate Limit: Uplink | Maximum uplink throughput for endpoints using this policy. Defaults to Unlimited. Select from the available rate options to cap uplink speed. |
| Rate Limit: Downlink | Maximum downlink throughput for endpoints using this policy. Defaults to Unlimited. |
| Packet Discard %: Uplink | Percentage of uplink packets to discard artificially. Slider from 0% to 100%. Used for testing or degraded-network simulation. Default: 0%. |
| Packet Discard %: Downlink | Percentage of downlink packets to discard artificially. Default: 0%. |
Click Save and Apply Rules to save all changes across all tabs.
Delete a Routing Policy
- Go to Configuration → Routing Policies.
- Click the delete icon.
- Confirm deletion.
A Routing Policy cannot be deleted while it is assigned to an Endpoint Group. Reassign or delete those groups first.
Updated 4 months ago